
 Right! Here's some news. The Virgin Media Shorts competition has swung around once more and I've decided to attempt to make this film, in time for the deadline for the competition. The reasons being, I could win £30,000 which would get my next short (some of you may already be aware of it, if not, feel free to ask) off the ground and having a deadline such as this one, July 18th, will help me keep 'The Haunts' chugging along at a pace.
So now theres a whole heap more riding on this film, let's get to work!
The last couple of days have been spent working out my character designs in 3-D. Taking the original paper sketches and transforming them, sculpting it into a 3-dimensional space. This process brings with it a heap of challenges and minute changes that must take place in order to iron out the attributes which work on paper but for one reason or another, simply cannot work in a puppet.
Take a look below at this finished maquette of our lead 'Clara'.
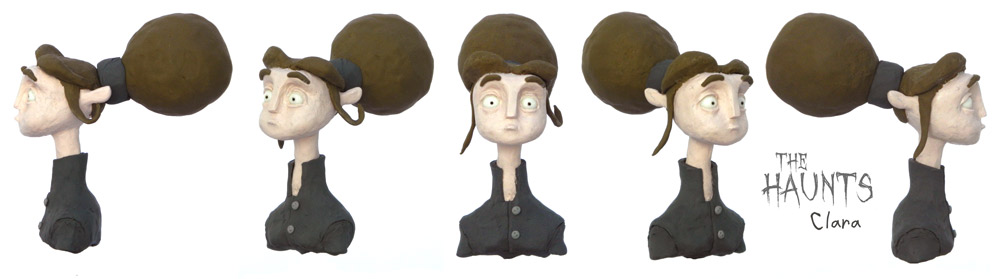
She's made from several colours (mixed to choice from other colours) of Newplast plasticine, which is the medium that I will be using for her face in the final puppet. Working with the clay, especially having one colour butt up against another, presents a heap of headaches; not least of which is the fact that one colour easily smudges into the next and involves constant cleaning of hands and scraping back of dirty clay.
In the final puppet, only the face will be made of clay. The hair will be fibrous or at the least, a hard cast skull cap type job and clothes will be made of material and tailored to the puppets form.
For an example of the kind of patience and skill it takes to pull off a puppet made and animated entirely in clay, look no further than the brilliant team over at Mr. Plastimime!, they're running a kickstarter to get Daniel Greave's next film off the ground. It's stunning stuff so take a look, they would really appreciate your support.
So, let me take you through my process and show you how the 'Clara' maquette came together:
 1. Gather your necessaries. Before I start, I collect my sculpting tools, my clay, glass beads (for eyes) and I bring my character design sketches to the table. Every decision I make from this point on is based upon checking against the original sketches, trying to bring in the graphic elements that I love into the 3-dimensional space. I then make a small wire loop and attach it to stiff cardboard to give me a simple armature on which to sculpt.
 2. I start by pressing together a ball of clay upon the armature and shaping it into a basic shape. I then press two eyeballs into it, checking back against the sketches to estimate the final distance between the eyes.
 3. Next, I take on the details, adding clay and smoothing clay as I go around. While I'm adding material I'm looking closely from a frontal and a profile view of the sculpt to make sure I'm hitting the right "graphic" lines that go into the characters design. At this stage I'm working very fast, moving on instict and trying to bring all of the sculpt along at the same pace to get a real sense of "the whole".
 4. Now is the time to block in the mass of the body and give more of a balance to the whole sculpt. At this stage I've also sculpted a hair cap of clay into the head, making sure to mould it into the correct hairline along the skull.
 5. 'Clara' has a lot of hair. A lot! But it's integral to the balance of her design. However it poses a slight problem for our sculpt in that, the amount of clay it would take to fill out her hair would be too heavy to hold up it's own weight. My solution to this was to build a small under structure for the hair from tissue and electrical tape adhered to another wire loop. The armature is then pushed into the back and the head and covered with a thin layer of clay, reducing the weight by about 3/4s.
 6. And we're almost there! The final stages see the little details attached. Sculpting some fringe to her hair and adding straggling hair beside her ears helps to sit the hair onto the head and balance out her face. I also added the hair band an a couple of buttons just to finish her off. The last thing to take care of is to smooth her out. This process is the most labour intensive and laborious of the whole thing. It involves pressing, patting and rolling the clay with your finger tips to weed out the imperfections and a quick application of oil that reacts to the clay in much the same way that alcohol does with super sculpey.
And she's done! That's all there is to it.
Take another look at the top image to see her in all her smoothened glory :)
If you reached the end here, thank you! I hope this was all interesting for you. Feel free to spread the word about the film, and get involved... I would love to here from you all.
No comments:
Post a Comment